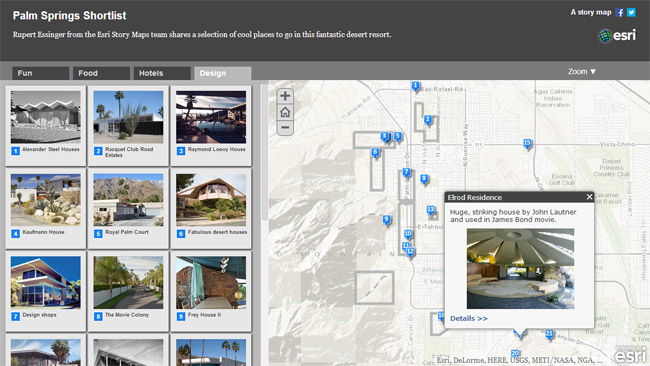
Shortlist is a popular story map template application that is ideal for presenting a curated list of points of interest in a particular geographic area. A good example is the Palm Springs Shortlist, featuring fun, food, hotels, and design topics located throughout Palm Springs, California.
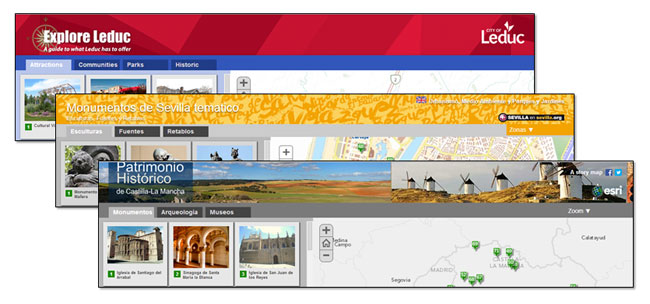
Other Shortlist apps created by Esri and the user community can be viewed at the Story Maps Gallery.
To make a Shortlist app you must first download the template, author a web map with locations of interest, add the web map ID to the template, and finally host the app from a server. This straightforward process is documented in an online tutorial.
The default Shortlist header is gray, but you can easily add visual spice by changing the color scheme or adding your own custom banner to match your organization’s look and feel. Here are several examples:
Before you begin
You should already have a successfully deployed Shortlist application. If not, follow the instructions in the Shortlist tutorial before moving on to the banner customization steps below. We’ll consider several possibilities – changing the color scheme of the banner, adding a banner graphic, and changing the color scheme of core template elements.
The changes can be made by overriding the default style settings of the application. The style changes can be made by editing the application source, by changing styles in the <head> or <body> elements of the index.html, or by using a separate cascading style sheet (CSS) that can be referenced in the index.html.
In this example a new stylesheet will be created to make the desired changes. This approach has a couple of advantages; the application source code is not altered making it easy to return to the default, and all of the customizations are in a single location. To setup the custom.css file, follow the steps below:
Step 1: Add a link to custom.css
In the index.html file, add a link to the custom.css stylesheet that will contain the style changes. Open the index.html in any text editor, and locate the links to existing stylesheets near the top of the file. Copy and paste one of the existing links to the end of the list, and rename the file referenced to custom.css, as shown below:
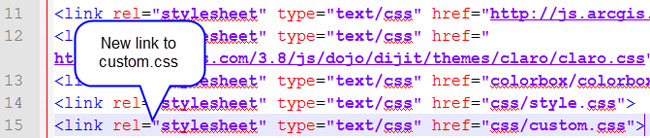
Or copy and paste the line below into index.html after the link to style.css as shown above:
<link rel="stylesheet" type="text/css" href="css/custom.css">
Step 2: Create the custom.css file
In the CSS folder of the Shortlist source, create a new empty file named custom.css. Changes described later will be made to this file only. If things go awry, just delete custom.css and start again. If you want to go back to the original template as downloaded, simply remove the reference to custom.css from the index.html.
Step 3: Determine the style element you want to change
Using the inspection tools available in your browser, you can peer at the Document Object Model (DOM) to discover the elements you will need to change. See the specific developer documentation for Chrome, Firefox, or other browsers to learn more.
Once you’ve discovered the elements, add them to the custom.css and make the desired changes. These changes will override the application defaults.
Example – Changing the banner color
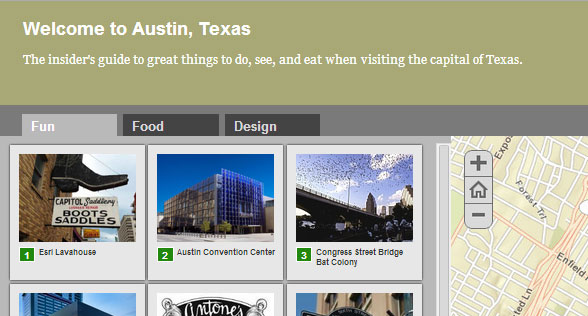
The default color scheme for Shortlist is white text on different gray backgrounds, as shown below:
The first change we want to make is to alter the color of the dark gray banner at the top of the application. Using the browser (in this case Chrome) developer tools, we can discover that the color of the banner background color is set in the #header element:
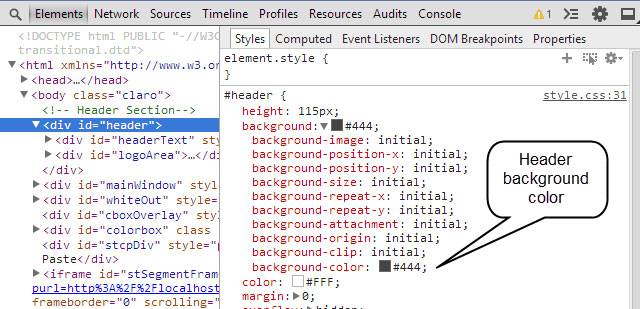
To change the banner color, edit custom.css and use the id and attributes of the element to set a new background color. In your custom.css add the id #header and set the background-color attribute to the desired color (in this case the hexadecimal color value). The id and attribute were both obtained from the inspector as shown above.
#header {
  background-color: #a8a875;
}
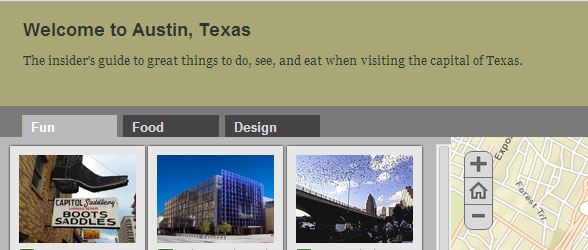
The above CSS will change the header background to green, as shown below.
To change the font color add the color attribute with the desired color:
#header {
  background: #a8a875;
  color:#333;
}
The Shortlist application banner now has dark gray text on a green background:
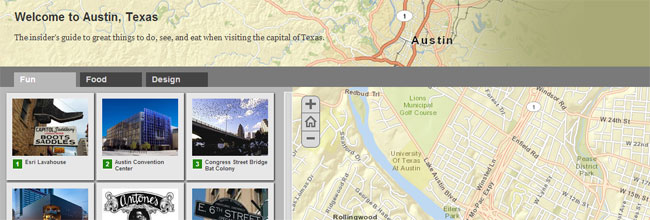
Next add a background graphic to the header. From the inspector we can discover that the header is 115px high. A custom banner image was made 115px high and 1000px wide, and saved to the images folder of the Map Tour. To make the image more pleasing, a fade-to-transparent gradient (which will let the background color show through) was applied to the right side of the graphic.
We also wanted the image to display once without repeating, and to be anchored on the left side. The changes made to custom.css to display the background image as described are shown here:
#header {
  background-color: #a8a875;
  background-image: url("../images/austin-ban.png");
  background-repeat: no-repeat;
  background-position: left;
  color:#333;
}
Here’s how the banner looks after these changes:
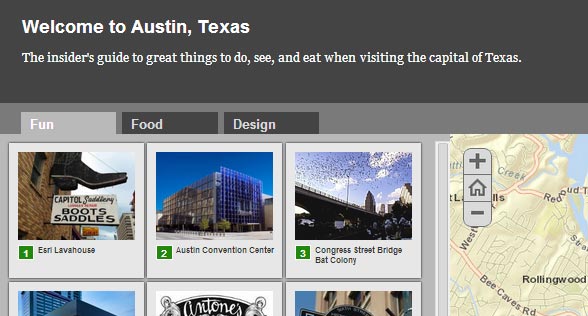
Doing More
By following the steps above in which you identify elements and then add the desired changes to custom.css using the id or class, you can continue to tweak your application’s look and feel. Below is the final Shortlist app, with additional customizations for the tab colors, thumbnail background, and header divider:

The custom.css file used is shown below:
#header {
background-color: #a8a875;
background-image: url("../images/austin-ban.png");
background-repeat: no-repeat;
background-position: left;
color:#333;
}
.tab {
background-color:#a8a875;
}
.tab.tab-selected {
background-color:#e2deb6;
color: #000;
}
#divStrip {
background-color: #dcc999;
}
#paneLeft {
background-color: #e2deb6;
}
.tab-selected {
background-color:#b9b9b9;
color:#FFFFFF;
cursor:default;
}
The same techniques can be applied to any application template.
For more information
More information about customizing the Shortlist template is available by viewing the Readme file found in the downloaded source.
Thanks to Corey Baker, Esri San Antonio, for contributions to this post.